It happens every winter like clockwork.
You look at your December heating bill and do a double take. Then you compare it to last year. Up 12%. The year before that? Up 8%. You haven’t changed the thermostat setting. You haven’t added a new addition. You swear the kids aren’t leaving the door open.
So you call the utility company. They say rates went up. You call an HVAC company. They say your furnace is old and inefficient. Maybe you replace a part. Maybe you think about a new system. Maybe you just pay the bill and feel vaguely guilty.
But here’s what I’ve learned after looking at hundreds of old houses with thermal cameras and blower doors:
Your heating bill isn’t climbing because your furnace is failing. It’s climbing because your house is leaking more than it used to.
And the reason that matters? Most families spend thousands on new furnaces, boilers, or mini‑splits without fixing the real problem. Then they’re disappointed when the new system burns almost as much fuel as the old one.
Let me walk you through what’s actually happening in an older suburban house. I promise it’s not complicated. And the fix is usually cheaper than a new furnace.
The myth of the “inefficient furnace”
I hear this all the time: “My furnace is 20 years old. It must be wasting half the gas I buy.”
That’s not how it works.
Furnace efficiency is measured by how well it converts fuel to heat. An 80% furnace sends 20% of the fuel’s energy up the flue. A 95% furnace sends only 5% up the flue. That’s real. But here’s the part the sales brochures leave out:
Even a perfectly efficient furnace can’t fix a leaky house.
Think of it this way: If your house is a bucket full of holes, a new furnace is just a bigger hose. You’ll still lose most of the water. The holes are the problem.
In an older suburban house, the “holes” aren’t obvious. You don’t see them. But they grow over time. Settling foundations create new cracks. Old weatherstripping hardens and crumbles. Previous owners cut holes for cables, pipes, and dryer vents and never sealed them. Attic insulation settles from 12 inches down to 4 inches.
Your heating bill climbs not because your equipment is getting worse, but because your building envelope is getting leakier every year.
The four real reasons your bill is climbing
I’ve traced this back in dozens of homes. Almost always, one or more of these four things is the culprit.
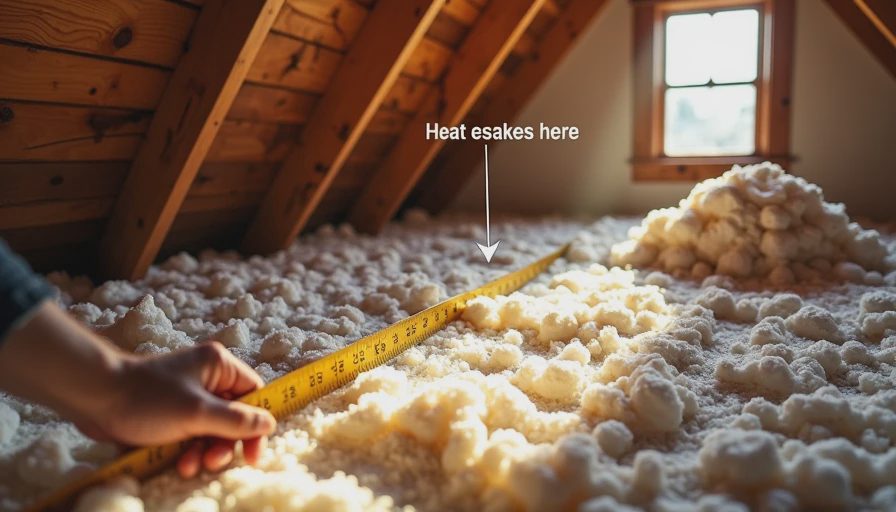
1. Your attic insulation has settled, shifted, or been disturbed
This is the most common reason bills creep up year after year.
When blown-in insulation is first installed, it’s fluffy and deep. But over time, gravity compresses it. Wind from attic vents can shift it. Electricians, cable installers, and pest control workers push it aside and never put it back.
You now have a thin spot or a bare patch above one of your bedrooms. That room pulls heat upward like a chimney. The furnace runs longer. The bill goes up.
How to check: Go into your attic with a tape measure during daylight. Measure the depth of insulation over different areas. Should be 12–14 inches. If you see bare drywall or insulation less than 6 inches deep, that’s your problem.
The fix: Rent a blower from a home center ($0 with insulation purchase). Add more blown‑in insulation across the entire attic floor. Cost: $1,000–1,500 DIY. Payback: one to two winters.
2. Your basement or crawlspace has become a cold air intake

Old houses breathe. They pull air in from the bottom and push it out at the top. That’s the stack effect.
When your basement or crawlspace is leaky and uninsulated, you’re pulling in cold outdoor air at ground level. That cold air gets sucked up through wall cavities, floor gaps, and open chases around pipes. Your furnace heats it, and it escapes through the attic.
The colder the winter, the stronger the stack effect. That’s why your bill climbs more on windy, frigid years.
How to check: On a cold, windy day, go down to your basement. Walk around near the foundation wall. Do you feel cold air coming in around the rim joist (where the basement wall meets the floor joists above)? Can you see daylight anywhere? Is the crawlspace door uninsulated and drafty?
The fix: Seal the rim joist with spray foam. Add a vapor barrier to a dirt crawlspace. Insulate the basement walls or at least the rim joist area. Cost: $200–500 DIY. The comfort difference on your first floor will shock you.
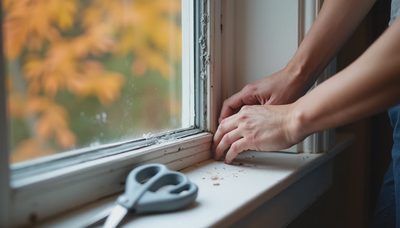
3. Your windows and doors have aged past the point of sealing
Weatherstripping doesn’t last forever. Neither do window glazing or door sweeps.
After 20 or 30 years, the rubber or felt weatherstripping around your doors turns into hard, crumbly plastic. The bronze or aluminum strips bend out of shape. The door sweep drags and wears down until a quarter‑inch gap appears at the bottom.
Windows are even worse. The original glazing putty dries out and falls off. The sashes no longer fit tightly because the house has settled. You get air infiltration that feels like a fan running 24/7.
How to check: Close a dollar bill in an exterior door or window. If you can pull it out without resistance, you have an air leak. Do this test on a cold morning and you’ll feel the draft instantly.
The fix: Replace weatherstripping. Install new door sweeps. Re‑glaze or add rope caulk to windows. Install storm windows if you don’t have them. These are all under $200 total and take a weekend. Do not replace the windows yet — that’s $15,000. Start with the cheap fixes.
4. Your ductwork is leaking into unconditioned spaces
If you have forced air heat, this is a hidden giant.
Ducts running through an uninsulated crawlspace, attic, or garage lose massive amounts of heat. The air never reaches your rooms. I’ve measured duct systems where 30% of the heated air leaked out before it left the basement.
And here’s the cruel part: leaky ducts also pull in cold, dusty air from those unconditioned spaces. So your furnace works harder, and your indoor air quality suffers.
How to check: Turn on the heat. Go into your basement, attic, or crawlspace and put your hand near every duct joint, seam, and register boot. Feel warm air blowing out? That’s lost money. Also look for dark dust streaks around duct connections — that’s evidence of long‑term leakage.
The fix: Seal every duct joint with mastic (not duct tape — that fails). Wrap ducts in unheated spaces with insulation. This is dirty, awkward work, but it costs about $100 in materials. Or hire a company to do duct sealing and testing ($500–1,000). Often the payback is less than two years.
Why your neighbor’s bill isn’t climbing (and yours is)

Sometimes families tell me, “My neighbor’s house is the same age and their bill is lower. What’s wrong with mine?”
Nothing is wrong. Your neighbor probably had work done you can’t see.
Maybe they added attic insulation five years ago. Maybe they sealed their rim joist. Maybe they replaced their original garage door (a huge air leak). Maybe they had their ducts sealed.
Old houses don’t age evenly. The ones that stay comfortable and affordable are the ones where someone did the invisible work. Not the kitchen. Not the bathroom. The attic, basement, and air sealing.
A simple action plan for this winter
You don’t need a thermal camera or a contractor. You can diagnose 80% of the problem yourself.
Weekend 1: The walkaround test
On a cold, windy day, walk through every room with your hand.
Feel for cold air around windows, doors, baseboards, and outlets on exterior walls.
Mark each leak with a piece of painter’s tape.
Weekend 2: The cheap fixes
Buy foam outlet gaskets and install them ($10).
Buy rope caulk or removable weatherstrip tape for drafty windows ($20).
Replace or add door sweeps and weatherstripping ($50).
Caulk gaps between trim and walls ($15).
Weekend 3: The attic and basement
Measure attic insulation. If it’s low, start planning to add more.
Buy a few cans of spray foam and seal the rim joist in the basement.
If you have a crawlspace with a dirt floor, buy a vapor barrier and lay it down.
If you have money left:
Rent a thermal camera from the library or a tool rental place. Find the hidden leaks.
Hire a company to do a blower door test ($300–500). It will show you exactly where your house is leaking.
What we did in our house
Our 1948 house had a heating bill that crept up $200 over three winters. I blamed the furnace. I blamed the rates. I blamed the weather.
Then I finally went into the attic with a tape measure.
Above the living room, the blown‑in insulation was only three inches deep. Previous owners had stored Christmas decorations up there and pushed the insulation into a pile in the corner. The drywall was bare.
I added 10 inches of new blown‑in across the whole attic. Cost me $800 and a Saturday. That winter, our bill dropped 18%. It’s stayed lower for four years.
I also sealed the rim joist in the basement. Cost: $40 in spray foam. That stopped the draft under the living room floor.
The furnace is still the same old 80% unit. It’s fine. I don’t need a new one.

No feedback yet — submit the first.